Friday, March 19, 2010

HEART FLOWER 2 -- KUSUDAMA


Here is a cubic kusudama folded from the heart flower variation.

There are some pluses and some minuses. The flower petals are longer and wider. This hides the connecting pieces quite well. On the other hand, this is a difficult model to put together. At first the connections between flowers were folded into pockets on the back/inside of the model. This became more problematic as the model neared completion. The last five folds were folded from and into pockets on the front.

A VARIATION ON THE HEART FLOWER


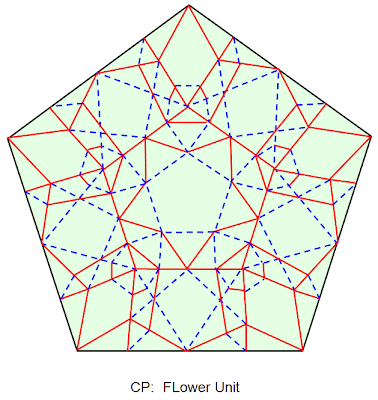
Here is a variation on the heart flower. In this model the heart shape is formed on the corners instead of the center sides.

Once again, the differently colored sections provide information about the size of the five paper additions to the basic flower unit. There position on the crease pattern are an approximation of their final place in the flower unit. Once again, the side additions connect the flowers together without glue but this time they are folded slightly differently from those used for the other heart flower. (See the photos in the following posting.)


By the way, many of my creations appear on my Flicker Photostream before they make it into my blog. If you are curious about what is in my origami pipeline you can look there.

http://www.flickr.com/photos/46625176@N00/
. . . . . . . . . . . . . . . . . . . . . .

THE HEART FLOWER KUSUDAMA


Recently, a reader requested information about one of my origami lanterns which she hoped to fold for her upcoming wedding. Unfortunately the item has not been diagrammed yet and the lid section is not an easy component for a near novice folder to fold or to put together.

I informed the reader that many kusudama models an be easily modified to become lanterns and I referred her to a kusudama of Russian origin which featured heart shapes, a theme which seemed appropriate for a wedding.

Contrary to the conventional rules of origami, that model required that the folder make cuts in the paper. I guess this cross between Kirigami (the art of paper cutting) and Origami (the art of paper folding)could be referred to as Kirorigami.

I found myself wondering if the model could be modified so that it was not necessary to make cuts in the paper. So I experimented.

I came up with the following model. It has a number of features which differentiate if from the Russian original, including the fact that it incorporates several pieces into each flower unit and that these units can be connected without glue.

The CP is included for those who can follow such things. The differently colored squares are the same size as the additional pieces required, and in approximately the same position from which they will be folded into the model. The center piece is not folded and simply sliped into the center of the flower. The corner pieces connect the flowers together. One of the photos shows how this is folded. A folded corner is folded together with a corner of the flower. This is held firmly in position when the sides of the heart shape are folded over at the back.


Saturday, March 6, 2010

SPRING BLOSSOM QUILT


One of my favorite signs of an immanent Spring is the many trees which burst into blossom around this time. First the fruitless pears become a froth of white and then the peach and prunus trees shower us in pink confetti.

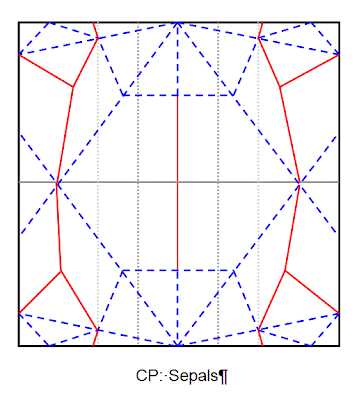
This hexagon based quilt is appropriate for the season with its pink flowers backed by salmon colored sepals and buff colored connectors.

Although the crease patterns look complicated this is not a terribly difficult model to fold. Nor is it particularly time consuming, as modulars go. The example was designed and folded in a day.

When I get around to making Step Folds and a set of diagrams it should be within the reach of all but the novice folder.


The quilt follows my usual practice in having a carrier module (with the salmon colored sepals or outer petals), a central flower which is tucked inside the center of the carrier module and connecting units which are folded over the edges of the module and tucked firmly inside.

The model does not require glue and is quite sturdy. It sits flat because of the hexagonal shape of the basic modules.


I am currently working on a pentagonal variation which, of course, does not sit flat and will form itself into another in my series of flower balls.


The hexagons which form the carrier case and the flower are derived from a sheet of American Letter or A4 sized paper. See previous entries for links to instructions on how to make a hexagon from a sheet of copy paper. After folding, the bottom and top flaps are cut off to form the hexagon shape.


The connector units are derived from a similarly folded sheet which has been cut to size according to the pattern
shown here. This time the bottom and top flaps are retained.

Tuesday, March 2, 2010

CITRUS FLOWER KUSUDAMA


Here is another kusudama which does not require glue to keep it together.

The construction uses a combination of regular pentagons and squares. Take a look at the table of pieces to see what these are.

The pentagons can be folded from a square and cut to size, or they can be drawn up on an graphic image program and printed out directly onto colored copy paper (used here) or onto plain copy paper which is then used as a template. Lay the template over decorative paper and attached with clips, magnets on each side of the paper or repositional glue. Cut out the pieces.

If you use the model as a lamp it is recommended that you use the new generation 7 watt LED globes which replace 60 -100 watt incandescent globes. At this stage of their development they are rather expensive although this will no doubt change as they become popular and production runs increase. Do not use cheaper globes as they are made to a different pattern and fail to give out much light.


Monday, February 22, 2010

THE HOOKED VASE


Since I have been working with pentagons it was inevitable that I would come up with a serendipitous design.


This model combines some of the features of my Coaster Bowl and its lids, some of the features Pentamontanas Flower and some of the features of one of Francis Ow's bowl. The hooked points are a novel feature that arose by accident and looked sufficiently interesting to preserve.


The model can be varied by folding the points and the top triangles hard against the base or by lifting them away from the walls.


Thursday, February 18, 2010

THE PENTAMONTAÑAS FLOWER KUSUDAMA


True to form, I have been creating other models while struggling to finish large and time-consuming ones.


The kusudama displayed here is a good one for folding between major projects. It is really easy and quick to fold from pre-printed pentagons.

If you want to be more adventurous you can fold a pentagon from a square. Phillip Chapman Bell (known as Oschene on Flicker) has provided instructions for doing this which you will find here:
http://origami.oschene.com/cp/Decagon%20SCP.pdf

My pentagons were created with the Draw program provided on Microsoft Word. I chose a pentagon shape from the shapes menu, clicked somewhere on the page to make it appear without ruining its aspect ratio, chose the "format autoshape" menu, locked the aspect ratio and then changed the size to suit. Mine has a height of five inches.
I can fit two of these on a standard letter sized sheet of paper. The result is a ball of about 8 inches in diameter.

I outlined the central star and filled it in. Unfortunately my laser printer only prints in black ink which results is a rather
boring dark gray color.

There is a lot of room for improvement in terms of folding material. I made it from cheap and simple stuff to prove that the idea would work. I think I have succeeded there.


Making diagrammed instructions is a lot of work. Making and photographing a series of Step Folds is almost as time-consuming. So today's lazy solution is to describe the relatively easy process in words and hope that all of the excellent origamists who follow this blog will be able to figure it all out.

I wonder who will be the first to do this? My bet is on one of my many Brazilian fans. They are an enthusiastic and dedicated lot. But perhaps my French, Russian or Japanese fans might beat them to it. Now all these people have a language barrier to circumvent so by right of text the English speaking Brits, Aussies or US Americans might get there first. If we go by volume then US Americans have a distinct advantage because there as so many of them. But I am willing to be surprised.

Here is the challenge: be the first to provide a comment to this blog entry which contains a link to a photo of this model which you have folded yourself. One more thing: tell us how long it took you to fold and complete the model. Can you do it in under an hour?


Go to it, my folding friends.


The folding sequence is this:

On the "white" side, fold and unfold all points in half, extending the crease to the opposite side. Turn the paper over.

On the "colored" side, refold as valley folds (and unfold) the part of the creases which extend from the center to the flat edge.


Fold and unfold all points in to the center.


Fold and unfold all points to the indented crease pattern on the opposite side. In other words, not quite to the other side.


That is all of the precreasing completed. Now let's finish the unit.

Turn over the tips of the five points at the ends of the extending crease lines. See the crease pattern for clarification.

Reverse fold (make vally folds into mountain folds) the triangles on the five flat sides. Valley fold the side edges of these triangles to their opposite sides. That is, fold these triangles in half lengthwise.
See the crease pattern for clarification.


Collapse your flower. Reinforce the valley folds around the central star. Note: the inner pentagon creases are non-functional. They are marked as blue dotted lines on the Crease Pattern.


Make 12. Six coordinating colors works well.

Now for the construction.

Glue the tiny triangular points to the same points on the neighboring flower. (I used bulldog clips to help keep the tips together until the glue dried.) Work in units of three to make a twelve sided ball. That is, each "hole" has just three flowers around it. See the photos for clarification.


Happy folding.


Tuesday, February 9, 2010

THE WORRY BOX


This box was made as a gift for a friend. It is made from letterhead paper which is 8.5 by 11 inches. The back of the paper is red. The front of the paper is white with a black and white striped border surrounded by a red pin stripe.

I used a standard Tomoko Fuse design but modified the lid in order to make the best use of the pattern. The rim is folded over several times and appears on the outside of the box. Unfortunately I could not line up the stripes at the diagonal fold on the sides.

Sunday, February 7, 2010

THE CORNER WINGED BOX


This series has side wings or wrap arounds as corner shapers.

The first in the series has truncated diamonds on the outside of the box and the tips turned into the box to prevent the wings from flying outwards. If you like the wings popping outwards then make the box without turning the top hem over and into the inside of the box. The side wings are folded from to the left and the edges of the top diamond wraps around it on the left and turns under freely on the right.

A variation has the top turned out as a rim and the internal wings halved and squashed across the edge seams. The covering truncated diamond cannot tuck into the underlying diamond in this version.


The next version turns half the diamond into the box and converts the turned over edge into triangles in the middle of the sides which are turned outwards.


THE BOAT BOX

A variation folds these triangles to look like a sail boat.


Tuesday, February 2, 2010

DECORATIVE MODULAR RING


Carrying on from yesterday's paper connection model I created a modular ring. There are two sections, which differ only in the finishing pattern of the center twist. The orange module overlaps the brown module at both ends.


Monday, February 1, 2010

THE WATCHBAND RING


I have been experimenting with modular paper connection again. This time I aimed to make a long ribbon of connected pieces of paper which could be used as a ring, bangle, belt, napkin holder, or similar.

I have called the
model The Watchband because the decorations on the front resemble the links of the standard metal watchband.

The green and blue model was folded from standard 6 inch kami squares which were folded into quarters in both directions and then cropped to produce 4 x 3 rectangles. This provides enough paper to ensure that inside is relatively smooth and can be worn as a ring or bracelet without irritating the wearer.

The original model, shown here in white, is folded from 2 x 1 rectangles.
The advantage of this version is that the model is less bulky and folds neatly from thicker paper. The model shown is folded from 4 x 2 inch pieces of copy paper. The disadvantage of this sized paper is that the back side of the model is bumpy and is uncomfortable on the skin if worn as a ring or bracelet. Of course, this problem might go away if it were also folded from thinner paper. Alternatively, the band can be worn inside out, with the link pattern on the inside and the diamonds showing on the front.

Crease Patterns for both the original 4 x 4 and the 4 x 3 (Variation 2) model are shown here. A third option, Variation 1, will produce a model with pointed bumps around the edges.