Friday, February 29, 2008

Modular Vase: Part 1

The past couple of weeks have been spent doing a lot of things other than origami. Life needs variety. Sometimes, however, I wish that the variety could be a little less stressful :-)

In between my other tasks I have continued to develop a large scale modular vase. It has lots of box pleats which I can use to shape the final product. I have got as far as putting together the bottom of the three major sections. Like the other sections, it is made up of eight other sections, if you don't count the "plug" to cover the central hole. The result, with a little modification of the parts which will later be used to connect the middle section, is a large dish.

There will be no edges showing in the final product. All the seams are hidden in the box pleats which are locked by the square foldings at the intersections. Although they look like square twists, these ones are not actually twisted. Once you know the secret of producing them they are not as impossible or as slow to collapse as you might think. Mind you, it took me a lot of trial and error and lateral thinking before I found a relatively easy way to make them. I shall eventually reveal all, so keep your bookmark or your feed subscription current.

This is a photo of the prototype base section. The central plug had not been added at this point.

This prototype has been folded from graph paper. There are a number of advantage to using graph paper in the early stages. Folding is faster when you do not have to find all crease lines in relation to previous folds and landmarks. Changes are easier to track. Transferring the creases to a master pattern is facilitated.

I am working on a conventional folding plan so that the model can be folded without the need for a printed guide. This is important because the top sections of a full sized jar use paper which is too large to be put through a normal printer. Besides, the need to print out CPs restricts the type of paper which can be used.

It is too early to provide diagrams or CPs. First, this is just the base section. Second, the model may go through several more changes before I am satisfied with its shape, locking mechanisms and ease of folding. I will post updates as I fold them.

I expect to be tied up with other rather time-consuming matters for several more weeks so postings will be a little more spaced out than the hectic activity in recent weeks. If you want to follow the vase through its development then consider subscribing to the RS feed. There is too much of interest on the Net to waste your time coming back here each day just in case you miss the next exciting installment.

Tuesday, February 19, 2008

CPs for the Water Lily Kusudama Series

Here are crease patterns for the Water Lily Kusudama and its derivatives and attachments. Unfortunately the CPs do not tell the whole story. There are some twists and tricks in putting these things together which are not at all obvious from the CPs. If you are a novice to middle level folder you may have to wait until I complete the diagrams before enlightenment is possible.

Begin by making a hexagon from a rectangle. The pattern is scaled for American Letter paper but the same concept applies equally well to an A4 sheet.


These are "rough and dirty" instructions which avoid me posting a full set of careful diagrams. If they leave you confused try Googling for better ones until I post some myself.

Divide the paper into four equal parts lengthwise. Mountain fold the bottom corners up to the quarter crease marks. This will give you sharp corner angles and two sides of the hexagon. Make the valley creases by appropriately lining up the edges. Complete the hexagon by mountain folding the paper along the appropriate edges. If you consider how the creased section will reflect when folded you can figure out which edges to line up. Try it out with a piece of scrap paper first.


The following CP is a stage along the way to making the Water Lily Kusudama units. It will provide you with the hex star and legged dish. I suggest that you fold the overlapping sections half way around and then unfold them and start at a different point. The final moves are a lot less confusing when the paper has already been primed to fold in the right direction.


The additional creases shown here will provide you with the water lily unit. Although they are shown on the back si
de of the paper they are made from the front. If you end up with the unit by following these CPs in the absence of step by step diagrams I will be quite impressed. Send me a photo to prove it. You will need eight water lily units for the kusudama and/or outer skin of the chopstick holder or vase.

The units are put together with the aid of strips made from the cut offs from the starter rectangle. They are four hex grid triangles long by one hex grid triangle wide. You need three of them per flower. Double the ends over and insert them into the matching shape that you will find by gently lifting the internal petal of a hex section and carefully pulling up the two flaps. Push the internal petal back down to lock them in place. Bend the strip on the central crease and insert the angled other end into a corresponding side of another flower. Continue until you run out of flowers to connect.

The next CPs are for the upgraded version of the central tube/vase. In order to get one that exactly fits the dimensions of the square left by the edges of the connected flowers, take a starter rectangle of the same size used to make the starter hexagons and crease it at the three-fifths point. Use my division helper to do this easily. (See earlier post.)

Next divide the three-fifths section into four equal parts and relect two of these on to the remaining paper. Cut off the left over section. Fold the rest according to the CP.


Roll up from the right hand side. Loosen the central section a little and twist the left hand rolling under the right hand rolling at the central point or thereabouts. I am afraid this a hard to describe in words. If you have made Kenneth Kawamura's twist box you will understand the procedure. If you can't figure it out then omit the odd configuration on the right hand side base section, roll the thing up starting from the right hand end and simply tuck the last flap under. The only difference is that the internal floor does not look quite so neat. If you are going to fill the tube up with something and don't intend to peer into its depths very often then this is probably quite adequate aesthetically and quite strong enough as well.

Unlike the model in the earlier photographs, this one has a triangular slash on just one of the external walls and a matching one on an internal wall. As well as being decorative, the slashes prevent noticeable sagging on the long side walls.

The result is pretty strong and sturdy but not, alas, waterproof. Don't fill it with fluid and use it for real flowers. If you are going to fill it with heavy things then you can strengthen it further (at the expense of shortening it) by turning over a narrow strip at the top. You can avoid unwanted crumpling by making 45 degree creases in the corners of each section before folding the material over to top. You can then ease it over a section at a time. Of course, pictures or detailed diagrams would help. Unfortunately preparing these takes more time than I am prepared to spend at the moment. Manana. (Where's the tilda when you need it?)


Filling in the square holes begins with a procedure similar to the internal tube. Take a piece of paper the same size as that used for the hexagon starter for the kusudama flower. Make a crease at the three fifths mark. Fold two squares from this section and discard the remainder. Fold each square to match the CP. You will need four squares (that is, two sheets of paper.)

In order to make the side tabs match the hexagonal angles into which they will slot make a template angle from a piece of the scrap, line its base up with the base line of each tab and fold the right side of each tab around the template. Lift up tabs in the pockets of the remaining hex sections of the water lilies and slip the tabs into them. Adjust. These square sections are not held together as firmly as the water lily pieces are to each other but they are not especially fragile either.

Enjoy!

Sunday, February 17, 2008

Water Lily Kusudama Vase Update


The Water Lily Kusudama now has inserts for the square holes and a new inner tube. I am working on CPs and diagrams. More on these later.

It's a nice sunny day and I and my family need to make use of it.


Thursday, February 14, 2008

Pseudo Tessellation


Place-mat, Table Runner, Table Cloth, Quilt, Wallhanging. Take your pick of what to call this model.

It was meant to be a Table Runner but the effort involved in making and assembling so many small pieces got old when I reached a size that you can stand a vase on. The starter paper varies in size from a small 5-1/2 inch square to a tiny 1 inch by 1-3/4 inch rectangle.

I like the look of the completed model but I am not in a hurry to repeat it. Needless to say, when I do repeat it there will be a few changes resulting from the experience.

Although the model holds together very well the thickness of the paper used for the tabs on the back side resulted in a tendency for the tucked in parts to come loose while working on neighboring pieces. Next time I will use tab paper which is thinner than the rest of the work instead of thicker. The reason for the negative polarity of the paper thickness was that the tab color that I wanted to use only came in the thicker weight. If you look carefully you will see that it is a lighter shade of the copper color used for the main pieces.

The edges need special treatment, especially for this sized piece. Does anyone have any suggestions?

Tuesday, February 12, 2008

Water Lily Chopstick Holder or Vase


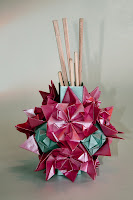
The waterlily kusudama has been given a central column which has morphed it into a vase or a chopstick holder.


Star Dish with Legs and Waterlily Kusudama

This has been a very busy week. I am in the process of putting the finishing touches to several new designs.

I spent a half hour away from the problems associated with these and fiddled with a hexagon.


The result was a star


which
morphed into a dish that stands on legs and snaps back into the star when you are finished with it


which morphed into a water lily


which morphed into an eight piece kusudama.


The kusudama is held together quite firmly by tabs cut from the scrap material left over after converting an American Letter sheet into a hexagon. No glue.


At a later date I intend to fill the square holes with leaves.


Crease patterns and instructions will come later.


Coming up is a placemat/table runner/wall hanging pseudo-tessellation which is made from square-based quilt-like modules and rectangular tabs. There is also another vase in production.

Monday, February 4, 2008

This Way Up Update.


Today I folded a couple more copies of
the This Way Up box. The one made from Stardream text weight paper came out well.

The one I made from wet-folded card-weight Sorbet Duo was not so successful. The paper is just too bulky to look good.


This is
one of my first experiments with wet-folding. It should really be called "damp folding" as a soggy piece of paper warps horribly. I lost a few good pieces of paper this way over the last couple of days.

Michale LaFosse recommends using a spray bottle to dampen the paper. This did not work very well for me. The bottle I purchased from the super-market was meant for cleaning fluids, not for plant misting. Even the finest setting was too coarse to provide an even non-blotchy film on the paper.

I discovered that a wrung-out common-or-kitchen-variety sponge wiped across the paper several times produced
about the right dampness. I rinsed the sponge thoroughally first. This was fortunate as it was primed with some detergent. Check for this possibility if you aim to copy this method.

I used a large deep flat bottomed plastic tray to sit the paper in as I sponged it. After about a minute I transfered the damp paper to a large piece of plastic. This was cut down from a large zipper bag from which I had removed the zipper and the front section. This protected my Division Helper sheet. Trying to align wet paper on top of a printed card was obviously not going to work.

Dampening the paper certainly helped to avoid the cracks which can appear in card when it is folded. The method resulted in a very firm and stable set of modules.

Putting the modules together, however, was very difficult. The dampness prevented tears but the paper marred when bulky sections were dragged tightly across adjacent sections.

My conclusion is that card weight material is not suitable for this model, or for any other modular creation where assembly requires that several layers of material be squashed tightly together.

Success with card weight material is dependent on a suitable design which factors in the thickness of the paper, its strength and its spanning ability. This is what I did with my card weight "sox box". The design for this does not work with text weight material without a few adjustments.

Sunday, February 3, 2008

A Tall Box

One of this week's serendipitous happenings was the creation of a tall box. I was playing around with inserts for the Arrow Head (Fish Base) box and came up with a lid which held together in a novel way. It seemed to require a tall base so that came next. It was definitely the week for tall things.

It is a bit stark in black and white. The dark color obscures the criss-cross markings on the base. which match those on the white part of the lid.


I am not sure that I have finished with this idea. It may go through some more development. Crease patterns will have to wait. I am not sure that I could reverse engineer the result just yet. The problem with accidental foldings, especially if they have gone through several trial foldings, is that they may be impossible to get back together in the same manner once they are unfolded.

Tall Vases

Here is another venture into the realm of vases. These ones are based on a rectangle.

These are vases for paper flowers or other objects which do not need to be regularly infused with di-hydrogen-monoxide. Because of the side steam, these models would not hold water, even if the folding material were waterproof.

Of course, this limitation could be overcome if the seam was welded, glued or stuck up with tape but we will leave that to non-purists who are do not concern themselves with following the traditional rules: no cuts, no glue, no tape, no staples. Perhaps you are thinking of those beautiful kusadamas that would behave like falling rain drops were it not for the presence of sticky stuff at the joints.

The models are relatively easy to fold although the final floor moves are a little tricky. Crease patterns will be supplied later. Just enjoy the photos for now.

This Way Up!

It has been a very busy week of folding and design.

The Fish Base Box has now been supplied with taller bases.


One version has become a "This Way Up!" Box.


Another version preserves the arrowhead and disguises the shaft in mono-color.


There are now a number of alternative lids, all of which continue to be useful as bowls when upturned.

One of the variations takes inserts. The possibilities for these are apparently endless. While most of the inserts serve no purpose other than decoration, some can be used to hide flat material placed in the center of the lid while others can be used to hide material within themselves.


Another version of the lid has an alternative folding for the arrow head which avoids the difficult task of tucking in the side pieces accurately. In my opinion, it is not as neat as the original but this may not be an important consideration for a beginning or novice folder.

Other variations of the lid provide sleeker or more minimalist creasings. A couple of these can be put together to form a short box of their own. In this case, the folding paper needs to be a quarter inch narrower for the one which will form the base.


Here are some generic crease patterns for the tall bases. I have not supplied crease patterns for the new lids as most of the variations are not difficult to figure out once you have made a model of the parent design.