Showing posts with label crease pattern. Show all posts

Sunday, April 20, 2014

BASIC BOXES - SERIES ONE


This is the first in a series of boxes that have been designed as sturdy stand alone containers, insert receptacles for decorative origami wraps, or bases for pretty lids made from a different pattern.


As of today, there are ten different boxes in the Basic Boxes Series.  Each  has a different feature. I will post details of each as I complete the diagramming and instructions.


The first in the series was designed to have very strong ends.


This makes it a good insert for the Crossover Box that I posted about on this blog some time ago.  That decorative wrap requires some downward force on the top during the final part of its construction.  The original box tended to collapse which resulted in a couple of us origami enthusiasts coming up with some modifications to accommodate this.  This is an additional one. 

I will come back to this box in later months as I have designed other variations.


All variations of the box can be squashed flat.  This means that it can be sent through the mail, put in a pocket or transported in a purse or a binder for later reconstruction.


The simplest version is made from construction paper (12" x 9" --> 8 x 6 grid) or other material with a 4:3 ratio. This version has a single layer floor.

If you use construction paper I would recommend using high end heavy duty fade resistant alternatives. These fold much better than the cheaper versions.


The more complex versions of the pattern, made from square paper or generic oblongs, have a double layer floor.


Here are the Crease Patterns for the three versions. I recommend making the simple 8 x 6 grid one first as the others require that you pull out the second layer of floor from the side walls, and then lock the model by folding over the end walls underneath this layer.


Full instructions, with copious diagrams and photos, are available for purchase from my ETSY shop. This can be accessed from the Side Bar of this Blog.

Monday, October 29, 2012

CENTRAL CROSS LETTERFOLDS


These letter folds are almost identical.  They have different additional crease patterns with the easier version having a lot more of them.


Here is the easier version (Type One).


The angled flaps are derived by folding a diagonal from the edges of the outside columns and then reflecting a marker crease from the orthogonal direction.


And here is the cleaner but slightly more difficult version (Type Two). 


This time the angled flaps are derived from diagonals that are creased between sections that are an eighth of the overall height or width.  To that end the pre-creasing divides the sheet into eight in both directions.


Since publishing this blog I discovered that this design was first invented by Romie Halabaso from the Philippines.  The diagrams and crease pattern do not appear to be in the public domain so I cannot tell whether our patterns are identical or not.

You will find Romie's letter fold here:
http://www.origami-resource-center.com/letter-envelope.html


Saturday, October 27, 2012

OFFSET X LETTERFOLD


This model has two versions with a couple of slightly different folding methods for the first one.  They look very similar and they are all simple to fold.

The main difference is in the the length and angle of the offset flaps, and the secondary difference is the pattern of crease marks on the front and back of the folded letter.


VERSION ONE (Wide offset flaps).


This version has flaps that come more than half way across their quarter square. The front of the letter has additional creases on the diagonals but none on the back.


This alternative crease pattern has a slightly different way of deriving the creases for the tuck-under flaps.  The result looks the same from the front but there is an X crease pattern on the back.  It is only minimally easier to fold.

Take your pick. Use whatever floats your boat.


VERSION TWO (Narrower offset flaps)


This is the easiest version to fold.  The flap is exactly half of the width of its square and the slope is therefore steeper than Version 1.  The detraction is that it has a busier pattern of creased squares on the front. 


Wednesday, October 24, 2012

SIMPLE X LETTERFOLD


This is a plain and simple fold.  It lends itself well to letter head paper with a contrasting border which becomes the focal point of the folding. 

It looks like a standard oblong envelope.  It it were not for the diagonal edges, that could catch on sorting machinery,  you could send this letter fold through the standard mail system. 

If you really want to do this then I suggest that you pack it inside a standard envelope. 

Alternatively you could make a transparent one with Gorilla Glue and clear Grafix Dura-Lar, Dura-Lar is an acetate alternative that holds a crease, unlike many other plastic type materials. Unlike acetate, it does not crack, tear or chip.  It is wonderful stuff for origami enthusiasts. If you live in the United States, you can buy small amounts from Dick Blick stores or larger amounts directly from the Grafix web site.  I imagine there are similar materials available in other countries.


Pre-crease you model before folding.  Then follow the directions for collapsing it.  If you start where indicated you will have a much easier time tucking the last corner under the adjacent folds. 


There are few more tricks which improve accuracy and ease of folding.  These are shared in the full set of diagrammed instructions which is now ready.  If you are a seasoned folder you will most likely discover them for yourself as you try out the model. 

Saturday, October 20, 2012

THE CRISSCROSS LETTERFOLDS


This letter fold is not a quick and easy one.  It will take you several minutes and involve you in some folds that require accuracy to work well.  The effect, however, is rather good.  Use it for that special person that you want to impress.

The front view is on the left of this page while the back view is on the right.

The brown paper that I have used to demonstrate the model here is the same basic color on both sides.  The front differs by having a slight shine, some green leaves in one corner and dark brown edges.
It does not give a good indication of how the model will look with paper that has a different color on both sides. 

A large section of the "back side" of the paper is apparent (on the back of the model.)  The only part of the "front side" of the paper that shows is the border areas.  Write on the colored side of the paper for this model, leaving wide margins.


Here is the Crease Pattern for the basic model.


I have included a few instructions and explanations on the CP.  It is not particularly intuitive, however.   I am working on the diagrams. 


Fold from the colored side.

Start with the horizontal and vertical creases on the mid-line.  Divide the model in 4 equal sections lengthwise. Turn the end corners over to make creases.  You will need these later.
Use the folded corners to make a crease that will give you an edge column on the short side that is the same width as the edge column on the long side. Use this crease as a marker to make the diagonals that will be your outside edges on the completed model.  Leave folded.

Hold the flaps down firmly and refold the edge column through both layers.  Accuracy is very important here.

You should now have two creases that define the edge of the central column that consists of the paper that is in excess of the perfect square formed by the side pieces.  Fold these creases to the center line, making a crease between them:  valley, mountain, central, mountain, valley folds.  Collapse the central column.  Leave the locking creases for later or you will probably be tempted to crease them at 45 degrees. Don't.  This will result in excess bulk during the next steps and make it difficult to make a flat model rather than a strained one. 

Now we start the final collapse.  Turn over the outside edges (which will lock your central column well enough).  Just fold the corners flat at this point.  Fold the corners to the center of the model, one at a time.  Crease from the center point to the outer edge, not the other way around.  The want those corners to meet in the middle.

You have now made enough creases to make the lock folds accurately.  You can unfold the model and put these in at this stage, if you want.  They make the overturned corners on the back of the model look neater.  However, they make the model hard to open quickly, which is what you generally want to do with letters. 

Having done that (or not) fold the edges over again and bring the corners to the center.  Now make the corner flaps into windmill ends.  (Collapse on the lines in the diagram if you are unsure how to do this.) Two of these flaps will rest on the central column so that the ends can be tucked under it.  Pick one and tuck the end firmly under the central column.  Folding clockwise, place the adjacent  corner over the top of the one you just tucked under the column.  Fold the next corner over this one and tuck its flap firmly under the central column also.  Thread the final corner under the flap you first folded. 

That's it.  If you want to make your model stay really flat, place a slightly damp cloth over the top and iron through this.  That should fix it. 

Open it up.  Write a nice note to a friend or lover, refold, and send or deliver the letter.

 (It this is as clear as dishwater you may want to purchase the diagrammed instructions for a couple of dollars after I've finished them and posted them on my Ori-Berry-Gami shop on  ETSY.)  It will be up and running in a few more days


.


VARIATION ONE.

The model works for A4 but the fold over flaps are fairly small.  This variation provides longer flaps, and looks a little more like a windmill.

The folding is the same except for the way in which the corner edges are folded.  Consult the crease pattern to see where the creases are and what your reference points are.  After you've done one the others will be easy.  After you fold the long diagonal line the shorter line will appear by magic as soon as you flatten the corner. 

Collapse the front as before.  This time you will have a larger flap to tuck under the central column which will make it more secure. 


 Here is the crease pattern for this one.  Note the differences. 


OTHER VARIATIONS.


You can modify the basic pattern in other ways as well.  Here are some examples.


Monday, October 15, 2012

GABLE LETTER FOLD


The front of this letter fold looks a little bit like the end of a gable roof, hence the name.


      Here is the back view.


This is another very easy model.  All it requires are a few cupboard folds, a hem and some corner bending.  Then it gets folded in half and one end gets pushed under the hem of the other. Easy!

The crease that makes the model look like a roof is made by running a nail over the top sheet of paper to accent the outline of the end that has been pushed under it:  a triangle with a flat top.

Usually the paper does not push all the way in so you get a little ridge at the bottom.  Think of it as roof spouting!    


The samples are made with American Letter sized paper but the pattern should work with A4 and probably with slightly different sized rectangles. 


Here is the Crease Pattern for this model.  This will help you create a letter fold with the colored side out and the gable roof end in white.  If you want to reverse this and make one with the colored side accented at the top, then start folding with the colored side up.


If you cannot see the crease marks easily on patterned paper then fold most of the model from the white side and then reverse the creases before you do the final fold and tuck the ends together.

Enjoy.


Sunday, October 14, 2012

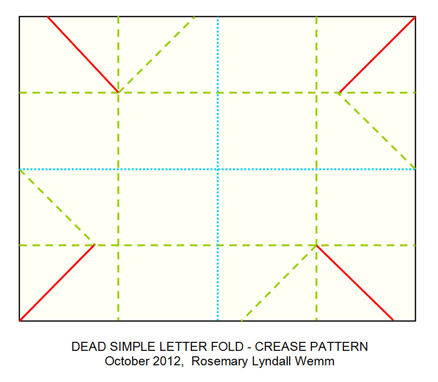
DEAD SIMPLE LETTER FOLD


This letter fold is really very easy.  The only tricky bit is pushing the last flap under the adjacent one.


It should be reasonably clear how to fold this from the crease pattern but here are some hints. 

Divide the paper into four equal columns in both directions. 


During the cupboard folds you will use to get the outer creases fold over the corners as indicated.  Unless you are using very thin paper it helps the collapse process if you don't fold the corners quite to their marker creases. Leave a slight gap so that the paper does not buckle when you fold the sides in during the final collapse.

Open the whole thing up and start collapsing by refolding in a clockwise direction.

With this crease pattern in this orientation start collapsing by folding over the right hand column.  Then refold the corner crease.  Next fold over the bottom panel.  Then fold over the corner crease.  Fold over the left hand column and then refold its corner.  Folding the upper panel over is a little tricky because it has to go under the right hand column and a mountain crease has to be flattened.  The final fold is tucking under the last corner. 


Saturday, October 13, 2012

DOUBLE DIAMOND LETTER FOLD


The Double Diamond Letter Fold is really quite easy to fold although it may look deceptively difficult.   Here is the crease pattern.


The marker creases, shown in grey on this diagram, add to the charm of the model so there is no need to make them soft. 


Friday, October 12, 2012

RIBBON BOW LETTER FOLD


Today's letter fold is shaped like a bow made from ribbon, so I have called it the Ribbon Bow Letter Fold. 


It can be made plainly, or it can be made with accented creases so that it looks a little more interesting.


The Crease Pattern is shown on a cupboard folded sheet of American Letter sized paper since the preceding folds are simply preparatory for the main ones and a standard raw crease pattern is unnecessarily complex. 

Make your final fold in the middle of the space between the bases of the small and large triangles,  as marked on the pattern.

The bow will also work with A4 and American Legal sized sheets, in which case and you will get more shaping on the "loop"sections.

Enjoy!


Thursday, October 11, 2012

DIAMOND HEART LETTERFOLD


.


This letter fold has two parts.  Part One is the letter fold itself.  Part Two is my variation of Edwin Young's Broken-Mended Heart. 

Here is Part One.

This model is quite easy in both its concept and the folding required.

We start by folding the paper in half lengthwise.  We make diagonals starting from the center (you will need to make a marker crease here).  Then we roll the model up from both sides.  The remaining flaps are tucked into each side.  The top flap has a little bit of extra fiddling so that it looks right and so that we get a tab to pull to start the letter unfolding.  It's pretty secure until you do that.

You can slot anything you like in the front pocket.  I choose the Young heart (with a few modifications to make it two sides and secure) because its construction allows it to be slotted over the edge of the pocket for effect.  This will stay put provided you don't turn it upside down or knock it.  Put the heart in the pocket for safe keeping while transporting the letter. 

I have completed diagrams for this model and for my modified Young heart.  I have also completed diagrammed instructions for the Double Wrap model.  I will make them available just as soon as our crashing web page host machine is upgraded.  That might be a month or two.  I'll keep you posted.