Monday, October 15, 2012

GABLE LETTER FOLD


The front of this letter fold looks a little bit like the end of a gable roof, hence the name.


      Here is the back view.


This is another very easy model.  All it requires are a few cupboard folds, a hem and some corner bending.  Then it gets folded in half and one end gets pushed under the hem of the other. Easy!

The crease that makes the model look like a roof is made by running a nail over the top sheet of paper to accent the outline of the end that has been pushed under it:  a triangle with a flat top.

Usually the paper does not push all the way in so you get a little ridge at the bottom.  Think of it as roof spouting!    


The samples are made with American Letter sized paper but the pattern should work with A4 and probably with slightly different sized rectangles. 


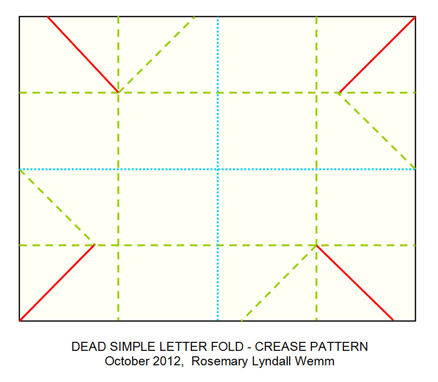
Here is the Crease Pattern for this model.  This will help you create a letter fold with the colored side out and the gable roof end in white.  If you want to reverse this and make one with the colored side accented at the top, then start folding with the colored side up.


If you cannot see the crease marks easily on patterned paper then fold most of the model from the white side and then reverse the creases before you do the final fold and tuck the ends together.

Enjoy.


Sunday, October 14, 2012

DEAD SIMPLE LETTER FOLD


This letter fold is really very easy.  The only tricky bit is pushing the last flap under the adjacent one.


It should be reasonably clear how to fold this from the crease pattern but here are some hints. 

Divide the paper into four equal columns in both directions. 


During the cupboard folds you will use to get the outer creases fold over the corners as indicated.  Unless you are using very thin paper it helps the collapse process if you don't fold the corners quite to their marker creases. Leave a slight gap so that the paper does not buckle when you fold the sides in during the final collapse.

Open the whole thing up and start collapsing by refolding in a clockwise direction.

With this crease pattern in this orientation start collapsing by folding over the right hand column.  Then refold the corner crease.  Next fold over the bottom panel.  Then fold over the corner crease.  Fold over the left hand column and then refold its corner.  Folding the upper panel over is a little tricky because it has to go under the right hand column and a mountain crease has to be flattened.  The final fold is tucking under the last corner. 


Saturday, October 13, 2012

DOUBLE DIAMOND LETTER FOLD


The Double Diamond Letter Fold is really quite easy to fold although it may look deceptively difficult.   Here is the crease pattern.


The marker creases, shown in grey on this diagram, add to the charm of the model so there is no need to make them soft. 


RIBBON BOW LETTER FOLD - Part Two


I tried out the Ribbon Bow Letter Fold on an A4 sheet


 And a sheet of American Legal sized paper.


Both of these paper sizes works well with this model.  The longer the paper, the longer the straight section at the end of the bow "loops".   I particularly like the effect with the legal sized paper which is the one to use if you want to write a looooonnnnng one sheet letter to a friend or lover. 

Friday, October 12, 2012

RIBBON BOW LETTER FOLD


Today's letter fold is shaped like a bow made from ribbon, so I have called it the Ribbon Bow Letter Fold. 


It can be made plainly, or it can be made with accented creases so that it looks a little more interesting.


The Crease Pattern is shown on a cupboard folded sheet of American Letter sized paper since the preceding folds are simply preparatory for the main ones and a standard raw crease pattern is unnecessarily complex. 

Make your final fold in the middle of the space between the bases of the small and large triangles,  as marked on the pattern.

The bow will also work with A4 and American Legal sized sheets, in which case and you will get more shaping on the "loop"sections.

Enjoy!


BROKEN_MENDED HEART


The letter fold in the last posting was shown with a heart poked in the front pocket.

Here are some samples of the version I have been using.


I have long been a fan of Edwin Young's Broken-Mended Heart.  http://faculty.purchase.edu/jeanine.meyer/origami/oriheart.htm

The problem with Young's original version is that it cannot be viewed from two sides. Sinking the folds means that the two sides come apart rather too easily.  I have modified Young's model so that these problems are resolved.   


Here is a Crease Pattern incorporating these changes.


Here are some hints on how to fold the relevant modifications. 


The tabs shown in Step 6 are pushed into the corresponding pockets on the opposite side when the model is collapsed. This stops the model from coming apart easily.

The tabs shown in the last steps are tucked into pockets on the top of the heart.   This method shapes the heart so that it appears more natural at both stages of the breaking and mending process.  Young's version looks oddly flattened on one of the two positions.

These diagrams are taken from my full length Instruction PDF which will shortly be on sale at my new ETSI Shop.   I will post a link to that site when it is up and running.  

ETSI does not provide an electronic down load function. Purchased items have to be physically emailed at some point after the seller gets the information from ETSI.  That can take hours to days.   Other options require a Web Page but, as I have already mentioned, our server is crashing and needs replacing with a more reliable model.   We intend to get around the problem by writing (and testing) a script that will email the purchased items instantly.  

It should take about a week to iron out all the problems.  From that point expect to see a LOT of diagrams suddenly become available for items that have been featured on this Blog, and a whole lot of other creations that has not been mentioned.


Thursday, October 11, 2012

DIAMOND HEART LETTERFOLD


.


This letter fold has two parts.  Part One is the letter fold itself.  Part Two is my variation of Edwin Young's Broken-Mended Heart. 

Here is Part One.

This model is quite easy in both its concept and the folding required.

We start by folding the paper in half lengthwise.  We make diagonals starting from the center (you will need to make a marker crease here).  Then we roll the model up from both sides.  The remaining flaps are tucked into each side.  The top flap has a little bit of extra fiddling so that it looks right and so that we get a tab to pull to start the letter unfolding.  It's pretty secure until you do that.

You can slot anything you like in the front pocket.  I choose the Young heart (with a few modifications to make it two sides and secure) because its construction allows it to be slotted over the edge of the pocket for effect.  This will stay put provided you don't turn it upside down or knock it.  Put the heart in the pocket for safe keeping while transporting the letter. 

I have completed diagrams for this model and for my modified Young heart.  I have also completed diagrammed instructions for the Double Wrap model.  I will make them available just as soon as our crashing web page host machine is upgraded.  That might be a month or two.  I'll keep you posted.