Showing posts with label folding instructions. Show all posts

Sunday, April 20, 2014

BASIC BOXES - SERIES ONE


This is the first in a series of boxes that have been designed as sturdy stand alone containers, insert receptacles for decorative origami wraps, or bases for pretty lids made from a different pattern.


As of today, there are ten different boxes in the Basic Boxes Series.  Each  has a different feature. I will post details of each as I complete the diagramming and instructions.


The first in the series was designed to have very strong ends.


This makes it a good insert for the Crossover Box that I posted about on this blog some time ago.  That decorative wrap requires some downward force on the top during the final part of its construction.  The original box tended to collapse which resulted in a couple of us origami enthusiasts coming up with some modifications to accommodate this.  This is an additional one. 

I will come back to this box in later months as I have designed other variations.


All variations of the box can be squashed flat.  This means that it can be sent through the mail, put in a pocket or transported in a purse or a binder for later reconstruction.


The simplest version is made from construction paper (12" x 9" --> 8 x 6 grid) or other material with a 4:3 ratio. This version has a single layer floor.

If you use construction paper I would recommend using high end heavy duty fade resistant alternatives. These fold much better than the cheaper versions.


The more complex versions of the pattern, made from square paper or generic oblongs, have a double layer floor.


Here are the Crease Patterns for the three versions. I recommend making the simple 8 x 6 grid one first as the others require that you pull out the second layer of floor from the side walls, and then lock the model by folding over the end walls underneath this layer.


Full instructions, with copious diagrams and photos, are available for purchase from my ETSY shop. This can be accessed from the Side Bar of this Blog.

Tuesday, March 25, 2014

CHECK HOLDER ENVELOPE OR LETTERFOLD


This item was designed for 24lb American Letter sized paper and meant to hold a standard American sized check.

The pattern can also be used with A4 paper, Construction Paper (typically 9 inches by 12 inches) and sturdy (kraft-based) gift wrap cut to an appropriate size.


The model looks particularly good when folded from Letterhead paper, especially one with a strong border.


Here is the Crease Pattern for the back of the model showing how it is folded up around the check/cheque.


This is a very easy pattern and is suitable for beginners, just as long as they are comfortable making a couple of "about here" folds when bringing in the side flaps and they can turn back a flap so that the gap between it and the crease it is lined up with is just a little over the thickness of the paper.


Full instructions, diagrams, photos and other images can be purchased at a very reasonable cost from my ETSY shop. See the side bar for a link.

Saturday, March 1, 2014

FULL INSTRUCTIONS FOR MY WALLETS ARE NOW AVAILABLE

Over the years I have had many requests for diagrams and instructions to fold the wallet that is pictured on the Header for this site. Well all that whinging has finally paid off. Yesterday I uploaded PDF instruction files for this Wallet Pouch and the simpler Catera Wallet to my ETSY shop. You can find a link to that shop on the side bar. One of my customers has already succeeded in folding the Catera Wallet and sent this lovely photo. Well done, maohare!

Monday, October 29, 2012

CENTRAL CROSS LETTERFOLDS


These letter folds are almost identical.  They have different additional crease patterns with the easier version having a lot more of them.


Here is the easier version (Type One).


The angled flaps are derived by folding a diagonal from the edges of the outside columns and then reflecting a marker crease from the orthogonal direction.


And here is the cleaner but slightly more difficult version (Type Two). 


This time the angled flaps are derived from diagonals that are creased between sections that are an eighth of the overall height or width.  To that end the pre-creasing divides the sheet into eight in both directions.


Since publishing this blog I discovered that this design was first invented by Romie Halabaso from the Philippines.  The diagrams and crease pattern do not appear to be in the public domain so I cannot tell whether our patterns are identical or not.

You will find Romie's letter fold here:
http://www.origami-resource-center.com/letter-envelope.html


Saturday, October 20, 2012

THE CRISSCROSS LETTERFOLDS


This letter fold is not a quick and easy one.  It will take you several minutes and involve you in some folds that require accuracy to work well.  The effect, however, is rather good.  Use it for that special person that you want to impress.

The front view is on the left of this page while the back view is on the right.

The brown paper that I have used to demonstrate the model here is the same basic color on both sides.  The front differs by having a slight shine, some green leaves in one corner and dark brown edges.
It does not give a good indication of how the model will look with paper that has a different color on both sides. 

A large section of the "back side" of the paper is apparent (on the back of the model.)  The only part of the "front side" of the paper that shows is the border areas.  Write on the colored side of the paper for this model, leaving wide margins.


Here is the Crease Pattern for the basic model.


I have included a few instructions and explanations on the CP.  It is not particularly intuitive, however.   I am working on the diagrams. 


Fold from the colored side.

Start with the horizontal and vertical creases on the mid-line.  Divide the model in 4 equal sections lengthwise. Turn the end corners over to make creases.  You will need these later.
Use the folded corners to make a crease that will give you an edge column on the short side that is the same width as the edge column on the long side. Use this crease as a marker to make the diagonals that will be your outside edges on the completed model.  Leave folded.

Hold the flaps down firmly and refold the edge column through both layers.  Accuracy is very important here.

You should now have two creases that define the edge of the central column that consists of the paper that is in excess of the perfect square formed by the side pieces.  Fold these creases to the center line, making a crease between them:  valley, mountain, central, mountain, valley folds.  Collapse the central column.  Leave the locking creases for later or you will probably be tempted to crease them at 45 degrees. Don't.  This will result in excess bulk during the next steps and make it difficult to make a flat model rather than a strained one. 

Now we start the final collapse.  Turn over the outside edges (which will lock your central column well enough).  Just fold the corners flat at this point.  Fold the corners to the center of the model, one at a time.  Crease from the center point to the outer edge, not the other way around.  The want those corners to meet in the middle.

You have now made enough creases to make the lock folds accurately.  You can unfold the model and put these in at this stage, if you want.  They make the overturned corners on the back of the model look neater.  However, they make the model hard to open quickly, which is what you generally want to do with letters. 

Having done that (or not) fold the edges over again and bring the corners to the center.  Now make the corner flaps into windmill ends.  (Collapse on the lines in the diagram if you are unsure how to do this.) Two of these flaps will rest on the central column so that the ends can be tucked under it.  Pick one and tuck the end firmly under the central column.  Folding clockwise, place the adjacent  corner over the top of the one you just tucked under the column.  Fold the next corner over this one and tuck its flap firmly under the central column also.  Thread the final corner under the flap you first folded. 

That's it.  If you want to make your model stay really flat, place a slightly damp cloth over the top and iron through this.  That should fix it. 

Open it up.  Write a nice note to a friend or lover, refold, and send or deliver the letter.

 (It this is as clear as dishwater you may want to purchase the diagrammed instructions for a couple of dollars after I've finished them and posted them on my Ori-Berry-Gami shop on  ETSY.)  It will be up and running in a few more days


.


VARIATION ONE.

The model works for A4 but the fold over flaps are fairly small.  This variation provides longer flaps, and looks a little more like a windmill.

The folding is the same except for the way in which the corner edges are folded.  Consult the crease pattern to see where the creases are and what your reference points are.  After you've done one the others will be easy.  After you fold the long diagonal line the shorter line will appear by magic as soon as you flatten the corner. 

Collapse the front as before.  This time you will have a larger flap to tuck under the central column which will make it more secure. 


 Here is the crease pattern for this one.  Note the differences. 


OTHER VARIATIONS.


You can modify the basic pattern in other ways as well.  Here are some examples.


Sunday, October 14, 2012

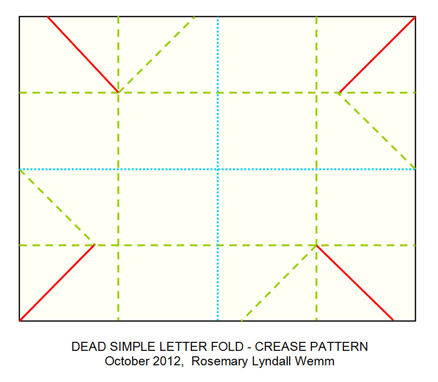
DEAD SIMPLE LETTER FOLD


This letter fold is really very easy.  The only tricky bit is pushing the last flap under the adjacent one.


It should be reasonably clear how to fold this from the crease pattern but here are some hints. 

Divide the paper into four equal columns in both directions. 


During the cupboard folds you will use to get the outer creases fold over the corners as indicated.  Unless you are using very thin paper it helps the collapse process if you don't fold the corners quite to their marker creases. Leave a slight gap so that the paper does not buckle when you fold the sides in during the final collapse.

Open the whole thing up and start collapsing by refolding in a clockwise direction.

With this crease pattern in this orientation start collapsing by folding over the right hand column.  Then refold the corner crease.  Next fold over the bottom panel.  Then fold over the corner crease.  Fold over the left hand column and then refold its corner.  Folding the upper panel over is a little tricky because it has to go under the right hand column and a mountain crease has to be flattened.  The final fold is tucking under the last corner. 


Sunday, October 4, 2009

CUBIC FRAME

I have been looking for something in which to store and display my increasing collection of kusadamas, some of which are almost 12 inches (30 cms) in diameter. Clear boxes have one or more of several problems: they are too small, not the right shape, too weak or very expensive.

I decided to make my own.

First I sought out designs for cut out boxes. None of these were entirely appropriate, either.

I began to think of making a rigid frame to which I could attach clear sheets of something. I wondered if the frame itself could be made out of some clear material. I am still wondering about that but do not have a clear answer yet. So far I have not come across anything clear that I would fold well. The closest thing is thin glassine which is not, of course, very strong. Velum cracks. Most plastic will not hold a crease.

I consulted the origami literature on the web but discovered that frames which I might be able to utilize just did not fit the bill. Some of the better ones were difficult to put together, where designed to form balls rather than cubes or had too many visually distracting struts. In other words they were meant to be an art form or their own rather than a vehicle to show off something else.

After weeks of frustration I decided to design my own display cases. I dislike working with huge sheets of material so I decided to make a modular frame which was strong enough to be made in a large size, be stacked up several high and be capable of having a floor inserted into it and acetate sheets glued to the struts or folded into them. I also wanted one which could be made into a cube or a rectangle and have struts where the thickness could be varied from model to model. In other words, I wanted a model which was fairly flexible in the way it could be made up and in the strength of the material which could be used to make it.

After several attempts which did not come out quite right, including one in card weight material, I came up with the model shown here.

The example is made from thin (20lb) copy paper in three colors. In spite of the flimsy paper the model is surprisingly strong. The example has strut reinforcers in the four uprights only and has a thin paper floor which is folded into the struts on two opposite sides.

As my dedicated readers will know, I tend to use copy paper for all my prototype models as it is cheap enough to throw away in bulk as I discard one failure after another.

Successful models are often made up with better paper but sometimes I post the designs here before I get around to that task - especially if the piece is a modular design which takes a long time to prepare, fold and put together. This one is a case in point.
In any case, using three different colored papers helps demonstrate the way the model is put together.

I intend to make the functional models in stronger metallic paper reinforced with relatively thick card in all twelve struts. The disadvantage will be that the last tab in each triad will be relatively more difficult to push in. The acetate sheet walls and floor will be glued on as acetate tends to crack if folded. I will experiment with other types of relatively inexpensive clear material of various rigidities.
Velum may work. Overhead projection slides may work. I doubt, however, that something as thin as the stuff used for wrapping food will be of any practical use.

Here are the crease patterns for the model.


This time I have included thumbnail copies of the folding instructions. The full sized ones will be available in my book when it is published. You may not be able to read all the written comments but the diagrams and images are big enough to allow you to make the model anyway. Have fun.


Tuesday, September 29, 2009

NAME and TITLE CARDS

Here are some simple folds which create stable name cards for table placement and title cards for display models. They are both made from A4 or American letter-sized paper.

In deference to my many Spanish speaking readers I have labeled the examples in Spanish. Hola mis amigos.

My many Brazilian followers will wish to translate these as "O Nome" and "O Titulo" respectively.
Olá pessoal!


The dotted crease marks at the top and the bottom of the Crease Pattern for the Name Card are lightly folded marker creases which do not extend into the space reserved for writing (or printing) the name.

They are there so that the side hems can be folded accurately. The model is completed by tucking the side hem at one end into the side hems at the other end. This forms a triangular shape with the floor being the only section showing the marker creases.


This is a very stable model.


The Title Cards are commenced by marking the center on the short side with a short light crease before folding the piece in half in the other direction (lengthwise). Now make a cupboard by folding the short edges into the center. The top and bottom quarters shown on the Crease Pattern will now crease themselves as you crease the topmost sheets (which is why these creases are shown in a lighter color).

Next, mark the diagonals on the sides. I have only shown these on one of the quarter sections. You can fold them on both if you wish, or else copy the sharp folds onto the other side by folding the layers together.


Next we halve the angle made by the side marker creases. Then fold a diagonal from the other direction (as shown) to meet the end of that halving fold. Fold the other side to match (if you have not already done so by folding through all layers.)

You should have triangular points on both ends made by two side flaps. Tuck the shorter one into the longer one on both sides. (See the photo of the back of the card for an example.) The resulting model should now slant at an appropriate angle for reading when placed on a table. Adjust the sides and the angle as you wish by folding the back triangles inwards or outwards.