Sunday, June 28, 2009
TWIST BOXES UPGRADED
I have been refolding my newest boxes with good quality paper.
I discovered a white and silver light weight card paper which folds fairly easily and does not feather or crack along the creases. It is a design from a K and Company product called simply "Foil". It is bound together with heavier scrap book type paper in a collection called "Wedding Paper Pad" by Marcella. The other papers, while gorgeous, are not suitable for folding. Although I searched for this paper on the Web I was not able to find it. Damn!
The cube-shaped twist box folded very nicely in this paper. The triangle on the handle is nicely centered because there is enough friction in the paper to keep it snug.
The paper worked well for the oblique walled box as well.
The next paper I tried was a lightly embossed iridescent paper which has a darker toned reverse side with no sheen. The sheet is slightly floppy and has a plastic feel to it so I was unsure whether it would hold a crease or have sufficient body to hold its shape. It came through on both counts. It helped to score if very firmly. The paper is marketed by the Paper Company in its Iridescent range and comes in American Letter size and 12" x 12". There are several different colors. You can buy it here: http://www.papercompany.com/metallicsEmbossed.htm
Saturday, June 27, 2009
THE TALL TWIST BOX
Here is the second consequence of the Tomoko Twist Tournament.
The twist is obvious this time; it is on the walls, both inside and out.
This model could really do with some good diagrams, step fold photos or a video. Perhaps I will get around to it soon. Perhaps not. There are so many other things to do - like more folding.
There are two crease patterns. The first one is sufficient for many types of paper, the second one adds extra creases which made the side walls cave in slightly instead of bowing outwards. With some types of paper this is a problem.
Once you have made the creases you will probably have some trouble getting the model together. It has to be eased up as it wants to fly open until it has been folded for a few hours and the creases "set".
The key to the whole thing is to work from the Y shaped mountain folds on opposite sides and the diagonals on the other two sides. To begin with, fold the forks of the Y only. This will produce a piece which stands up above the top of the walls. This will become the roof and handle. The stem of the Y is only folded down and across the top of the box after the four side flaps have been folded under around the box and secured. So fold them first. I use hair pins to keep the folded over side tabs from unfolding until I compete the model.
Explaining how to make the "handle" at the top is a little hard to explain in words, but I will try.
It is achieved by sliding the top triangle shaped pieces together with the pointed flaps going under the opposite piece. Then the triangles are folded down on either side. The valley crease at its base is lifted in order to do this and then pushed down again to form the handle.
The result is a lid which is not as firm as it would be if a flap from one side were folded over and into a pocket on the other side. For most purposes it is quite firm enough. The pieces want to fly upwards far more than they want to push out. If you look carefully at the photo you will see that the center of the tucked under triangle on the handle is not quite flush with the flap it is tucked under. I don't think it spoils the look of the handle too much.
I am sure that sounds like esoteric mud! Trying to explain a 3D process in words is very difficult. Be assured that I will diagram this, and a truck-load of other models on this site, just as soon as I can find time between design flights. One day I might finish the origami book I started over a year ago. If I could just stop having folding ideas that I cannot leave alone .......
UPCOMING TRIP TO MEXICO
I am in the process of planning another trip to Mexico in August, September, October. I expect to spend most of my time in various places in Jalisco State, including Guadalajara. I would be happy to visit any folder or folding group within reasonable distance of this area. If you want to issue an invitation please leave a message here and I will reply off site.
And for my Spanish-speaking friends, permítame practicar mi español.
Estoy planeando un viaje a Mexico después de que el año escolar comienza de nuevo. Espero estar en varios lugares en Jalisco, incluida Guadalajara. Yo sería feliz de visitar cualquier grupo papiroflexia o persona en este ámbito. Por favor, deje un mensaje aquí y yo la respuesta fuera de sitio.
ANOTHER TRIANGLE WALL TWIST BOX
Once started on a mission to create something I frequently end up creating several different things as a consequence of the mental stimulation. Sometimes the connection is clear, sometimes it is subtle and other times there is no apparent connection whatever. Those cases usually arise as a folding accident or because I take time out from the challenge which is occupying me.
The Tomoko Twist Challange produced one creation which has an obvious connection to the challenge which spawned it and one which is more subtle.
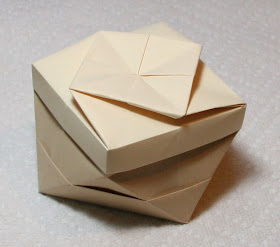
We will start with the oblique triangle sided box shown here. It has obvious design similarities to the box of the last posting but the mode of construction is actually quite different.
The twist is on the floor of the box. The walls are held together by tucking the side tabs in between the wall sections. The top is covered by tucking the top tabs under the adjacent flap in a clockwise direction. The petals sandwich the flap between it and the tab underneath.
The crease pattern has some lines in muted tones. These are additional creases which may be added for thin paper or if you want the walls to be extra sturdy. They are generally not needed.
The Tomoko Twist Transformation Trials: 2
Here is a third lid for the American Letter sized Triangle Sided Twist Box. It has a small insert which matches the color of the base. The insert is made from a square sheet of paper with a width which is equal to two of the nine sections of the lid.
This lid and base confirmed that the best sizing for 20lb copy paper is American Legal size minus 1/8 inch for the base and standard American Legal size for the top. These two fit perfectly: not too tight, not too loose.
Here are the crease patterns for both parts.
Friday, June 26, 2009
The Tomoko Twist Transformation Trials.
Some of my LA folding friends have been redesigning one of Tomoko Fuse's modular twisted boxes for single sheets of paper.
The blue and purple box is a copy of the original Fuse box (minus the lid). It is made from two squares of paper.
Jim Cowling from the LA folding community redesigned this box for a single dollar bill: that is, a sheet of paper with dimensions which are 4-1/4" x 11" or multiples thereof. John Andrisan designed a dollar bill sized lid for this box.
Here are examples folded by the designers in ordinary copy paper and standard origami kami.
Here is how these boxes differ from the original Fuse design. The Fuse box (sounds electrical doesn't it?) is on the right (the grey one), the Cowling-Andrisan box is on the left (the green one). The folded sheets show how the pattern looks when folded with one dollar-sized piece of paper versus how the pattern looks when folded with two square pieces of paper (the Fuse original).
I have uploaded a copy of the Cowling-Andrisan one-sheet pattern. There are no indications of which direction the creases are to be folded (whether valley or mountain) but the photos should help sort this out. Failing that, fiddle until it looks about right. It works for me. :-)
The model looks good when folded with dollar bills, as intended. The one in green is the LA version folded by the designers.
The one in grey is my rendition of the Dollar Bill version made from a photocopied facsimile. I modified the floor slightly from the LA original. I just can't leave good designs alone :-)
Not to be outdone, I went about designing a version for an American Legal sized sheet. Here is what I came up with.
The base has a pleat in it which adds some interest. There are two versions of the lid. (Actually I came up with about a dozen of them, but these two appealed to me the most.)
The decoration on the tops of the lids is achieved by folding the roof of the lid inside out so that the bulky stuff is on top.
If the paper is thin enough there is no need to shorten the paper for the bottom. The lid on the pink box is slightly sloppy. The bottom was made with paper with a quarter inch removed on the long axis. I think it would have been better with only 1/8" removed. The cream lid fits on the brown box a little too snuggly; one side of the brown box bows slightly.
This is a relatively quick box to fold, but it is not for beginners. The main challenges are dividing the sheets into nine parts on the long axis, folding them accurately into squares on the short axis (with a little bit left over). The next challenge is to tuck one end into the other before folding up the floor (or the top of the lid).
I solved the division process by pinch creasing the long sheet at the half way point on both ends. Then I took out my Division Helper (see one of the first entries in my blog) and lined the mid-point of the paper up to the 4-1/2 line and a side to the zero line. Holding the paper down firmly on the far side I folded the zero edge to the 4 line and repeated that on the other side. The rest of the creases can be derived from these two.
Folding accurate squares is tricky. First I pinch folded a triangle on both bottom corners, spanning two sections. Than I lined up the ends of the pinch creases and folded a line across the page. I used the accordion method to fold the paper into more or less "accurate" large squares (two by two), then I halved these. The side with the excess paper is the bottom of the folding page. The rim of the box or lid is folded from the top line of squares.
Tucking one end into another requires patience. A colorful vocabulary sometimes helps as well. I fold the floor section up against the walls and then fold the model flat on one of the original division creases. I start by sliding the floor sections together (hold with a hair pin or clip). Then I squared up the model before sliding the pleated sections together. Finally, I line up the top sections and roll over the rim. It helps to start folding the floor partially down before completing this step because it gets in the way of the rim. An alternative is to use a strong clip to hold the cross-over piece at the rim, continue with the floor folding and return to fold over the rim at the end.
The rest is relatively easy. I said, relatively.
Tuesday, June 23, 2009
PASSION FLOWER: 1
My next entry in the origami flowers section is the development of a flower which I shall call the Passion Flower because of the emphasis on radiating stamens. This grew out of the Fragrant Flower of earlier postings.
I began experimenting with the fawn and green example. It has eight petals with alternating colors. Some of the most beautiful of Passion Flowers have alternating petals.
The model was folded while I a finger of my left hand in a splint so it is a little sloppy. At the time I was more concerned with the question of whether the idea was going to work than I was with how well I was folding the model. It is presented "as is" and I hope no-one will be rude enough to use it as an example of my folding prowess.
Instead of a separate petal connector, each petal is slotted into the side of its neighbor. It changes the look of the flower quite dramatically.
Since the Passion Flower has ten petals I created the pink version.
After this I progressed to the bi-color example which is made from sheets of paper with a different color on each side. There is a very limited range of double color papers in folding weight. How I wish the card weight tone-plus-darker-tone range was available in a text weight paper.
The purple/orange combination seemed to be the best choice at the time but the flower has turned out rather darker than I would have liked.
It is not difficult to fold but it helps to have a good supply of cushioned hair pins to hold the pieces together while folding.
Here is the crease pattern for this flower. This is a Model 1.2 version Crease Pattern so it includes a couple of additional creases that were not part of the pre-creasing process of the purple-orange model shown here. (They were added in a less precise manner late in the folding process.)
These additional creases in the inner petals (the ones that are not mirrored on the other side of the diagonal) help to more sharply define and separate the inner petals from their sheaths. They also help to pull the stamen parts together more firmly. The result is a crisper looking flower.
This flower worked well until I tried to connect it to another one. The first examples fell apart too easily, looked ugly, were excessively complicated or pushed the petals apart in a way which spoiled the overall effect. I finally found a sturdy and good looking connection. It requires a "male" and "female" petal - one on one flower and the other on its adjoining flower.
The connection has one drawback: it cannot be accomplished between the petals of finished flowers. Each connecting petal (every alternate one of the ten) has to be connected to a neighbor before being put together with the rest of the petals in its flower head.
Rather than undoing the completed flowers and refolding them I have decided to make new flowers. This time I will alternate the purple-orange double petals with single petals of a contrasting color. I am waiting for a roll of lilac/white craft paper to coordinate with the slighlty garish color-scheme of my precut paper. By the way, I am using 5-1/2" squares for this model. The flowers end up 4" wide and should make a reasonably sized kusudama when 12 of them are connected. The unattached alternate petals should poke out to fill in the small gap between these 12 petal flowers.
In the next posting I will upload CPs for the male and female connecting petals together with pictures of the kusudama as it is put together.
As usual, I am folding/designing more than one model at a time.
Much to my disgust, I STILL haven't completed the last section of the display quality Tier Box I started waaaaayyy back in these postings.
FRAGRANT FLOWER: 5
I have begun to put Type 2 flowers together to form a kusudama. I have three together so far. The leaf connectors, when pulled out sideways, nicely fill in the gaps between the flowers. (See the center of this photo).
I am starting to wonder, however, how I am going to get the last flowers into position. The connectors, you see, are at the bottom of the petals. This will pose some challenges.
The fall back position may be to leave out the top most flower and use the opening as an entry/exit for string and power cords. I intend to poke LED lights through the central hole in each flower, as I did in the earlier photos of this model (in orange and yellow on that occasion.)
FRAGRANT FLOWER: 4
I continue to experiment with the Fragrant Flower.
Type 3 and 4 of the Petal Connector/Stamen is difficult to fold in its final stages. Here is an alternative version. It is easier to fold, but in the final analysis I like the look of the more difficult version better.
Here (in orange) is what the stamen petal connector looks like when it is made up. The top section of the central part (ignore the fold over stamens) is sunken. The more petals there are in the flower the more this section closes up.
Compare this to the earlier model (in pink).
The connected flower is shown with seven petals.
Here is the crease pattern.
Sunday, June 14, 2009
FRAGRANT FLOWER: 3
I am still working on a Fragrant Flower kusudama. In the meantime, here is what happened when I put ten Type One petals together. It looks a little like some of the passion vine flowers I have seen. Or maybe a water lily.
I does not look like it will work in a pentagon kusadama arrangement. I suspect that forcing two petals to become one side will distort the flower unacceptably.
Friday, June 12, 2009
THE FRAGRANT FLOWER: 2
I am still experimenting with the No-Glue Fragrant Flower.
I decided to try a different approach to the stamens so that the leaf connector would not interfere with the slotting of the stamen into the petal. This meant shortening the stamen. This was rather a headache. Here is the CP for my first attempt.
The shortened stamen still interfered with the leaf connector but this proved easy to fix. I simply folded the tip of the diamond shaped cup inside. This left a triangular cup for the petal to sit in. Part of the sides fitted neatly under the edges of the stamen, locking it in place. It helps to use a hair pin to keep the back wall against the back wall of the petal during the construction stage.
My solution to the stamen problem resulted in a piece which poked out further than one of the contour folds on the petal so these folds were deleted.
All the pieces looked good and seemed to work well. It was not until I connected the final piece that I discovered that there was a problem. Here is what I got.
Well, it worked and it looks good, but it's not very practical for use as a kusudama unit because it is too floppy and the petals are too far apart. Nor will it work with a LED in its center. In fact, the center was just too floppy for just about anything. It might work well when used as a decoration around a tall pentagonal cylinder. I may try this idea out sometime in the future. It could turn out to be an elegant vase or just a daffodil facsimile.
So I reorganized my fingers and started again. The final solution to the stamen problem didn't change much in the way of creases, most of which are simply redirected. Folding the last part is, however, a bit of a challenge.
The last piece has to be persuaded to sit over the top of its counterpart in order to form the little cup on top. It is difficult because of the fact that the sections which have been folded over to close off the gap at the back pull this section in the opposite direction until the unit is closed. And the unit cannot be closed entirely until this piece has been eased over the top of them. It requires a little patience. Tweezers help.
Perhaps I will find a more sophisticated way of folding this part after I have struggled with a few more of them.
The result, when it is finally achieved, looks good and functions well.